

This comprehensive charcoal drawing guide covers everything from basic charcoal drawing techniques to advanced methods for creating stunning charcoal portraits. Learn how to do charcoal drawing with step-by-step instructions, discover the best charcoal drawing tools, including willow charcoal and compressed charcoal, avoid common mistakes, and master the 7 main drawing techniques. Whether you’re interested in portrait drawing, landscape work, or exploring various subjects for charcoal drawing, this guide provides professional insights to elevate your artistic skills.
Charcoal drawing stands as one of art’s most expressive and versatile mediums, offering unparalleled depth, contrast, and emotional resonance. This comprehensive guide will transform your approach to charcoal drawing, whether you’re picking up charcoal for the first time or seeking to refine advanced techniques. For artists looking to develop their unique artistic style, charcoal provides an excellent foundation for exploring personal expression.
Table of Contents
- Charcoal: Types and Characteristics
- Charcoal Drawing Tools
- Essential Tools and Materials
- Fundamental Charcoal Drawing Techniques
- The 7 Main Techniques in Drawing
- Creating Different Textures
- Subjects for Charcoal Drawing
- Modern Charcoal Drawing Techniques
- Top 5 Charcoal Drawing Tips
- Advanced Charcoal Drawing Methods
- Composition and Planning
- Common Mistakes in Charcoal Drawing
- Troubleshooting Common Issues
- Advantages of Charcoal Drawing
- Disadvantages of Charcoal Drawing
- Key Takeaways
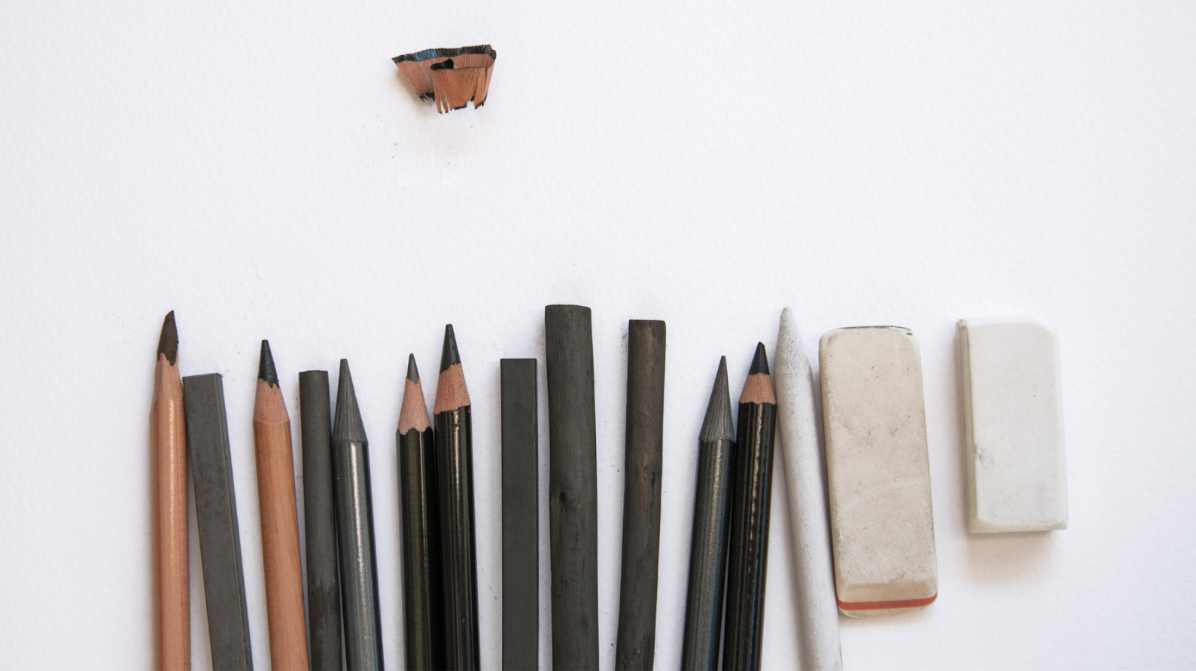
Charcoal: Types and Characteristics
Before mastering charcoal drawing techniques, understanding your materials is crucial. Each type of charcoal offers unique properties that dramatically affect your artistic outcome. Professional artists often recommend starting with high-quality materials to ensure the best learning experience.
1. Charcoal Types Comparison Table
| Charcoal Type | Hardness | Erasability | Best For | Dust Production | Permanence |
| Vine Charcoal | Very Soft | Excellent | Initial sketches, atmospheric effects | High | Low |
| Compressed Charcoal | Varies (2H-6B) | Moderate | Detailed work, rich darks | Moderate | High |
| Charcoal Pencils | Varies (H-6B) | Good | Precision work, fine details | Low | High |
2. Vine Charcoal: The Foundation Medium
Characteristics:
- Made from grape vines or willow branches
- Produces delicate, easily modifiable marks
- Perfect for establishing initial compositions, especially when experimenting and pushing past early creative blocks during practice.
- Creates soft, atmospheric effects
Professional Applications:
- Gesture drawing and figure studies
- Establishing value patterns before detailed work
- Creating misty, ethereal backgrounds
- Teaching fundamental drawing principles
Winsor & Newton offers excellent vine charcoal options for beginners and professionals alike.

3. Willow Charcoal: The Artist’s Choice
Characteristics:
- Made specifically from willow tree branches
- Slightly smoother than vine charcoal
- Excellent for large-scale preliminary sketches
- Perfect for underpainting in mixed media work
- Creates subtle, velvety tones
Professional Applications:
- Life drawing and gesture studies
- Architectural preliminary sketches
- Charcoal portrait initial layout
- Foundation work before applying compressed charcoal
4. Compressed Charcoal: The Powerhouse
Characteristics:
- Ground charcoal bound with gum or wax
- Delivers intense blacks and rich midtones
- Available in multiple hardness grades
- Excellent for building dramatic contrast
Professional Applications:
- Portrait work requiring deep shadows
- Still life compositions with strong lighting
- Architectural drawing with bold contrasts
- Fine art pieces requiring permanence
5. Charcoal Pencils: Precision Tools
Characteristics:
- Compressed charcoal encased in wood
- Offers maximum control and precision
- Minimal mess and dust production
- Excellent for detailed work
Professional Applications:
- Intricate botanical illustrations
- Technical drawing requiring accuracy
- Mixed media compositions
- Detailed portrait features (eyes, lips, hair)
Charcoal Drawing Tools and Materials for Professional Results
Having the right charcoal drawing tools and materials is essential for achieving professional results. Whether you’re a beginner or an experienced artist, the quality and variety of your tools can greatly influence your creative control and outcome. Here’s a complete guide to what every charcoal artist should have.
1. Primary Drawing Tools
Charcoal Types
- Vine/Willow Charcoal: Soft, erasable, ideal for initial sketches; available in thin, medium, and thick sticks.
- Compressed Charcoal: Denser with rich blacks; perfect for deeper tones and lasting marks (grades 2H – 6B).
- Charcoal Pencils: Encased for precision; available in grades H, HB, 2B, 4B, and 6B.
- Charcoal Blocks: Great for covering large areas quickly and building bold tonal backgrounds.

2. Erasers and Correction Tools
- Kneaded Eraser: Flexible and moldable; lifts charcoal gently without damaging paper.
- Vinyl/Plastic Eraser: Removes stubborn marks and provides crisp, clean edges.
- Gum Eraser: Soft option for gentle erasing and surface cleaning.
- Eraser Pencil: Allows for fine, detailed correction work.
- Electric Eraser: Offers speed and precision for large or controlled removals.
3. Blending and Application Tools
- Blending Stumps (Tortillons): Rolled paper tools in varied sizes for smooth blending.
- Soft Cloth or Tissues: Useful for large-area blending and atmospheric effects.
- Chamois Cloth or Natural Sponge: Ideal for subtle transitions and organic textures.
- Blending Brushes or Cotton Swabs: Add feathered edges or fine adjustments.
- Sandpaper Block: Keeps blending stumps or charcoal points sharp.
4. Paper and Surface Selection
The texture (“tooth”) of the paper determines how charcoal adheres and how layers build.
- Textured Papers: Charcoal-specific papers (like Strathmore or Canson) or cold-press watercolour paper for a strong grip.
- Smooth Papers: Hot-press watercolour paper or vellum Bristol board for precise, detailed rendering.
- Toned Papers: Grey, cream, or coloured surfaces help establish mid-tones and depth naturally.
You can more about paper selection at Jackson’s Art Supplies.
5. Preservation and Finishing
- Workable Fixative: Protects layers while allowing rework.
- Final Fixative: Seals the completed artwork permanently — always spray in a well-ventilated area.
- Glassine Sheets: Place between drawings to prevent smudging.
- Portfolio Case or Flat Storage: Keeps works protected and flat.
6. Organising and Maintaining Tools
- Charcoal Holder: Extends short charcoal pieces and keeps hands clean.
- Apron or Smock: Protects clothing from charcoal dust.
- Pencil Case or Storage Box: Keeps tools organised and reduces breakage.
Recommended Starter Kits
Beginner Kit:
- Vine charcoal (3 sticks), 3 charcoal pencils (2B, 4B, 6B), kneaded eraser, 3 blending stumps, charcoal pad, workable fixative.
Intermediate Kit:
- Full range of compressed and pencil charcoals (2H – 6B), multiple erasers, blending tools, varied paper textures, and both fixatives.
Professional Kit:
- Premium willow and compressed charcoal, complete pencil range, electric eraser, advanced blending tools, archival papers, professional-grade fixatives, and storage solutions.
For detailed buying recommendations, refer to Strathmore’s charcoal drawing guide.
7. Preservation and Finishing
Fixatives:
- Workable fixative for layer building
- Final fixative for permanent protection
- Proper ventilation essential
Storage Solutions:
- Portfolio cases for artwork protection
- Glassine sheets between drawings
- Flat storage to prevent warping
Fundamental Charcoal Drawing Techniques
1. Value Control: The Foundation of Great Drawing
Understanding the Value Scale: Create a 10-step value scale from pure white to deep black. This exercise develops your ability to see and reproduce accurate tonal relationships. Proko offers excellent tutorials on value control fundamentals.
Exercise 1: Basic Value Scale
- Draw 10 connected rectangles
- Leave the first white
- Gradually darken each subsequent rectangle
- Make the final rectangle pure black
- Practice until transitions are smooth and even

2. Mark-Making Techniques
Linear Application
- Hatching
Creating value and depth using closely spaced parallel lines in a single direction. - Cross-hatching
Building tonal variation by layering intersecting sets of hatched lines at different angles. - Contour lines
Lines that follow the natural curves and form of the subject suggest volume and structure. - Gestural marks
Quick, expressive strokes that capture movement, rhythm, or emotional intensity.
Tonal Application
- Side application
Rubbing the side of charcoal to create soft, wide areas of tone – ideal for large shapes or backgrounds. - Blending
Smoothing out charcoal using fingers, stumps, or cloth for soft gradients and subtle shifts in tone. - Scumbling
Loose, broken, and irregular application of charcoal to create textured, dynamic surfaces. - Lifting
Erasing or dabbing out charcoal to create highlights or correct areas, often used for contrast and light effects.
3. Basic Shading Patterns
Directional Shading: Always consider light source direction. Shadows should follow the form they’re describing, wrapping around three-dimensional shapes naturally.
Core Shadow vs. Cast Shadow:
- Core shadow: Darkest area on the object itself
- Cast shadow: Shadow thrown onto adjacent surfaces
- Understanding this distinction creates a convincing volume
New Masters Academy provides excellent instruction on shadow fundamentals.
4. Blending Mastery
Smooth Blending Technique:
- Apply charcoal in overlapping strokes
- Use a blending stump perpendicular to strokes
- Work from dark to light areas
- Clean the stump regularly on scrap paper
Selective Blending: Not everything requires smooth blending. Strategic areas of sharp contrast create visual interest and focal points.
The 7 Main Techniques in Drawing
Mastering these seven fundamental charcoal drawing techniques forms the foundation of all professional artwork. Each technique serves a specific purpose and can be combined for stunning effects.
1. Hatching
Definition: Creating value and texture through parallel lines drawn in one direction.
How to Apply:
- Hold the charcoal at a 45-degree angle
- Draw closely spaced parallel lines
- Maintain consistent spacing for even tones
- Vary spacing to control value intensity
Example Application: In a charcoal portrait, use hatching to render the shadow side of the face, with closer lines under the cheekbone for deeper shadows and wider spacing on the forehead for lighter mid-tones.

2. Cross-Hatching
Definition: Layering multiple sets of hatched lines at different angles to build darker values and complex textures.
How to Apply:
- Begin with one direction of hatching
- Add a second layer at a different angle (typically 45-90 degrees)
- Add additional layers for deeper values
- Vary pressure between layers for tonal variety
Example Application: When drawing fabric in still life, cross-hatching creates the illusion of woven texture. First layer follows the fabric’s primary weave direction, second layer adds depth, and third layer intensifies shadows in folds.
3. Scumbling
Definition: Loose, irregular circular or random marks that create textured, broken tones without defined edges.
How to Apply:
- Use the side of the charcoal
- Apply in small, random circular motions
- Vary pressure for tonal variation
- Overlap strokes for richer values
Example Application: Scumbling works beautifully for creating cloud formations in landscape drawings, giving them soft, organic edges and atmospheric depth. Also effective for rendering weathered stone or rough tree bark.
4. Blending/Smoothing
Definition: Merging charcoal particles to create smooth, gradual transitions without visible marks or texture.
How to Apply:
- Apply charcoal evenly to the area
- Use blending stumps, tissue, or fingers
- Work in circular or directional motions
- Build gradually from light to dark
Example Application: In charcoal portrait work, smooth blending is essential for rendering skin tones on the illuminated side of the face, creating the soft, realistic appearance of flesh without visible strokes or texture.
5. Stippling
Definition: Creating value and texture through numerous small dots or marks, with density determining the darkness.
How to Apply:
- Hold a charcoal pencil or a sharpened stick vertically
- Make small, controlled dots
- Place dots closer together for darker areas
- Spread dots farther apart for lighter values
Example Application: Stippling excels at rendering subtle textures like porous surfaces, distant foliage, or fine fabric weaves. In a landscape drawing, the stipple technique can create convincing gravel paths or sandy beaches.
6. Lifting/Subtractive Technique
Definition: Removing charcoal to reveal lighter values or the white paper beneath, essentially “drawing” with erasers.
How to Apply:
- Apply charcoal evenly to the area first
- Use a kneaded eraser for soft lifting
- Use a hard eraser for sharp highlights
- Use eraser pencils for precise details
Example Application: This technique is powerful for creating dramatic lighting effects. In a portrait, after covering the entire face with mid-tone charcoal, lift out the highlight on the nose bridge, cheekbone, and forehead to reveal bone structure and light source.
7. Directional Stroking
Definition: Applying charcoal with strokes that follow the contours and form of the subject to enhance the three-dimensional appearance.
How to Apply:
- Observe the directional flow of the subject
- Apply strokes following the form’s curves
- Use longer strokes for smooth surfaces
- Use shorter, broken strokes for textured surfaces
Example Application: When drawing hair in a charcoal portrait, directional stroking is essential. Each stroke follows the hair’s natural growth pattern and flow, creating realistic texture and movement. For a cylindrical object like a vase, vertical strokes that curve around the form emphasise its roundness and volume.
How to Create a Charcoal Drawing (From Beginner to Advanced)
1. Setup and Preparation (10 – 15 minutes)
- Materials checklist (paper, vine charcoal, compressed charcoal, erasers, blending tools)
- Workspace setup (lighting, board angle, securing paper)
- Tip: Keep tools and cleaning materials handy to maintain flow while working.
2. Basic Drawing Process (For Beginners)
Step 1: Outline and Proportion
- Lightly sketch your subject using vine or willow charcoal.
- Focus on accurate proportions rather than detail.

Step 2: Establish Light and Shadow
- Identify light direction.
- Mark highlight and shadow zones for value planning.
Step 3: Building Values
- Block in shadows with compressed charcoal.
- Add mid-tones gradually.
- Leave highlights untouched.
Step 4: Blending and Refinement
- Blend gently using stumps or cloth.
- Reinforce contrast where needed.
- Lift highlights using a kneaded eraser.
Practice Exercises:
- Value scales
- Simple shapes (sphere, cube)
- Basic still life (fruit or cup)
3. Intermediate: Developing Realism and Form
Understanding Composition
- Create thumbnail sketches for value planning and balance.
- Focus on focal point placement and edge variety.
Advanced Value Work
- Build smooth transitions between light and dark.
- Use compressed charcoal for depth and charcoal pencils for precision.
Form Rendering
- Follow surface planes with directional strokes.
- Keep highlights clean and preserve paper texture for realism.
4. Advanced: Charcoal Portrait Drawing
Step 1: Planning and Layout
- Choose a clear, well-lit reference.
- Sketch proportions and feature placement lightly with vine charcoal.
Step 2: Building Structure
- Block in shadows, then mid-tones.
- Keep checking symmetry and proportions.
Step 3: Detailing Features
- Eyes: Define contrast and add catchlights.
- Nose: Shape with soft gradations.
- Lips: Model using tone, not outlines.
- Hair: Treat as mass first, then refine strands.
Step 4: Background and Integration
- Develop a background that enhances contrast and depth.
- Use soft transitions for realism.
Step 5: Finishing Touches
- Final highlight lifting and contrast deepening.
- Clean edges and remove smudges.
- Preserve with fixative.
5. Recommended Practice Progression
- Beginner: Simple geometric still lifes
- Intermediate: Portraits with clear lighting
- Advanced: Multi-figure compositions or mixed-media charcoal art
Learn more about composition principles from Drawing Lessons 101.
Creating Different Textures in Charcoal
1. Skin Texture Techniques
Smooth Skin (Portrait Work):
- Apply charcoal smoothly with a blending stump
- Build up gradually in thin layers
- Use a kneaded eraser for subtle highlights
- Avoid over-blending, which creates flatness
Aged Skin:
- Establish a basic skin tone with smooth blending
- Add wrinkles with sharp charcoal pencil lines
- Blend selectively, leaving some lines sharp
- Use directional shading following the skin’s natural planes
For deeper insights into portrait techniques, explore the resources available through the Portrait Society of America.

2. Hair Rendering
Dark Hair:
- Map overall hair shape and major sections
- Apply base tone, leaving highlight areas
- Add individual hair strands following the growth direction
- Vary stroke weight and pressure for realism
Light Hair:
- Work on toned paper for better value control
- Use predominantly subtractive techniques
- Add darker strands selectively
- Maintain overall light value while showing form
3. Natural Elements
Tree Foliage:
- Use stippling motion for dense leaf clusters
- Vary the pressure for light and shadow areas
- Leave gaps for sky holes
- Add individual leaves only in the foreground
Water Surfaces:
- Horizontal blending for calm water
- Vertical reflection patterns
- Sharp horizontal lines for the water surface
- Broken reflections for moving water
Rock and Stone:
- Build a form with directional shading
- Add texture with varied pressure application
- Use sharp edges for crystalline surfaces
- Blend for weathered, rounded stones
Artists Network provides specialised techniques for natural subjects.
4. Architectural Elements
Brick Surfaces:
- Establish overall wall tone
- Add individual brick patterns with an eraser
- Vary brick tones for realism
- Include mortar lines with consistent spacing
Wood Grain:
- Apply the base tone following the wood direction
- Add grain lines with a charcoal pencil
- Vary line weight and spacing
- Include knots and irregular patterns
Subjects for Charcoal Drawing
Charcoal’s versatility makes it suitable for countless subjects. Here are the most popular and effective subjects for charcoal drawing, organised by difficulty level and technique requirements.
1. Subtractive Drawing Approach
This professional technique involves covering the paper with charcoal and “drawing” by removing material to create lights and forms.
Process:
- Cover the entire paper with an even charcoal tone
- Use various erasers to “pull out” light forms
- Add darker accents where needed
- Refine with additional charcoal application

Beginner-Friendly Subjects
- Simple Still Life Objects
- Spherical fruits (apples, oranges, pears)
- Cylindrical objects (bottles, cans, cups)
- Cubic forms (boxes, books)
- Single flower in a vase
- Simple drapery or cloth
Why These Work:
- Clear, simple forms ideal for learning value and shading
- Controlled lighting conditions
- Stationary subjects allow for extended study
- Forgiveness of small mistakes
- Natural Objects
- Individual leaves
- Seashells
- Stones and pebbles
- Pinecones
- Feathers
Why These Work:
- Interesting textures for technique practice
- Organic shapes develop observational skills
- Small scale reduces intimidation
- Natural value ranges suit charcoal’s capabilities
Intermediate Subjects
- Landscape Elements
- Individual trees with detailed bark and foliage
- Rocky formations and cliff faces
- Cloud studies and sky compositions
- Water reflections in lakes or streams
- Rural buildings and barns
Why These Work:
- Develops atmospheric perspective skills
- Practices various texture techniques
- Builds confidence with larger compositions
- Charcoal excels at capturing natural atmosphere
- Animal Studies
- Pets (dogs, cats) from photos
- Bird studies focusing on feather texture
- Horse heads and portraits
- Wildlife from reference photos
Why These Work:
- Fur and feather textures are ideal for charcoal
- Develops observational and rendering skills
- Emotional connection motivates completion
- Variety of value ranges and textures
- Architectural Subjects
- Historic buildings with interesting details
- Bridges and industrial structures
- Interior spaces with dramatic lighting
- Urban street scenes
- Doorways and windows with character
Why These Work:
- Straight lines and perspective challenge skills
- Strong light and shadow opportunities
- Texture variety (brick, stone, wood, metal)
- Compositional complexity builds planning skills
Advanced Subjects
- Charcoal Portrait Work
- Self-portraits using mirrors
- Portrait studies from life or high-quality photos
- Character studies of elderly subjects
- Child portraits (challenging but rewarding)
- Multiple-figure compositions
Why These Work:
- Ultimate test of observation and technique
- Charcoal perfectly captures skin tones and textures
- Develops understanding of human anatomy
- High emotional impact and personal connection
- Professional opportunities in portrait commissions
- Figure Drawing
- Gesture drawings capturing movement
- Full-figure studies with dramatic lighting
- Partial figure studies (hands, feet, torso)
- Multiple figures in interaction
- Draped figures showing fabric and form
Why These Work:
- Develops understanding of human form and anatomy
- Charcoal’s quick coverage suits gesture work
- Challenges all technical skills simultaneously
- Foundation for professional figurative work
- Complex Still Life Arrangements
- Multiple objects with varied textures
- Reflective surfaces (glass, metal, mirrors)
- Transparent objects (wine glasses, bottles)
- Fabric with complex folds and patterns
- Thematic arrangements with storytelling elements
Why These Work:
- Tests mastery of multiple techniques
- Complex value relationships
- Compositional challenges
- Suitable for exhibition and portfolio work
Specialised Subjects for Charcoal
- Dramatic Light Studies
- Single light source creating strong shadows
- Backlighting with rim light effects
- Candlelit scenes with warm glow
- Window light creates patterns
- Night scenes with selective illumination
Why These Work:
- Charcoal excels at dramatic contrast
- Creates emotionally powerful images
- Challenges value control at extremes
- Produces gallery-worthy results
- Abstract and Expressive Work
- Emotional abstractions using gestural marks
- Textural explorations without a specific subject
- Value-pattern compositions
- Mixed-media abstractions incorporating charcoal
Why These Work:
- Freedom from representational accuracy
- Explores charcoal’s expressive potential
- Develops personal artistic voice
- Contemporary art market opportunities
Subject Selection Guidelines
Consider These Factors:
Your Skill Level:
- Start simple and progress gradually
- Don’t skip foundational subjects
- Challenge yourself incrementally
Available Time:
- Quick sketches: Simple objects, gesture studies
- Extended projects: Portraits, complex still life, landscapes
Lighting Control:
- Indoor subjects: Complete control over lighting
- Outdoor subjects: Work quickly or from photos
- Consider the time of day for consistent light
Personal Interest:
- Choose subjects that genuinely interest you
- Emotional connection improves results
- Passion sustains through challenging passages
Technique Development:
- Select subjects that challenge specific skills
- Vary subjects to develop versatility
- Return to similar subjects to measure progress
Modern Charcoal Drawing Techniques
Contemporary artists continue to push the boundaries of traditional charcoal drawing. These modern charcoal drawing techniques blend classical methods with innovative approaches for unique artistic expression.
1. Digital-Hybrid Workflow
Technique Overview: Combining traditional charcoal drawing with digital tools for planning, editing, and enhancement.
Process:
- Use digital apps (Procreate, Photoshop) for initial composition studies
- Print reference images with adjusted values for better charcoal translation
- Scan completed charcoal drawings for digital enhancement
- Combine multiple charcoal drawings digitally for complex compositions
- Use digital tools to plan value patterns before starting on paper
Professional Applications:
- Illustration work requiring revisions
- Creating edition prints from original charcoal work
- Portfolio presentation with enhanced contrast
- Social media content optimisation
2. Wet Charcoal Techniques
Technique Overview: Applying water or other liquids to charcoal creates paint-like effects and unique textures impossible with dry application alone.
Methods:
Water Wash Technique:
- Apply charcoal powder or loose charcoal
- Use a wet brush to spread and blend like watercolour
- Creates smooth, ink-like washes
- Excellent for atmospheric backgrounds
Spray Bottle Method:
- Apply dry charcoal to paper
- Lightly mist with water from the spray bottle
- Creates organic, unpredictable textures
- Perfect for abstract and expressive work
Direct Wet Application:
- Dip willow charcoal directly in water
- Apply to paper for intense, permanent marks
- Creates bold, dramatic strokes
- Useful for strong linear elements
Safety Note: Ensure proper ventilation and use archival paper designed to handle moisture.
3. Mixed Media Integration
Charcoal + White Chalk/Pastel:
- Work on toned paper (grey, brown, or colored)
- Use charcoal for darks and mid-tones
- Apply white chalk or pastel for highlights
- Creates an expanded value range and dimension
- Perfect for dramatic figure studies and portraits
Charcoal + Graphite:
- Combine charcoal’s rich blacks with graphite’s precision
- Use charcoal for broad value areas
- Add graphite for fine details and clean lines
- Excellent for architectural and botanical work
Charcoal + Ink:
- Apply charcoal for a value foundation
- Add ink (pen or brush) for sharp accents and details
- Creates striking contrast and definition
- Popular in contemporary illustration
Charcoal + Acrylic/Gesso:
- Apply gesso or white acrylic as a base or for corrections
- Layer charcoal over dried paint
- Create textured surfaces before charcoal application
- Enables corrections impossible on bare paper
4. Large-Scale Installation Work
Contemporary artists create massive charcoal drawings for gallery installations and public spaces.
Considerations:
- Use charcoal blocks for quick coverage of large areas
- Work on reinforced paper or directly on walls
- Employ assistants for collaborative large-scale projects
- Use ladders, scaffolding, or extended tools for reach
- Plan compositions digitally before execution
- Consider viewing distance in detail decisions
Famous Examples:
- Robert Longo’s large-scale charcoal drawings
- Vija Celmins’ detailed large-format works
- William Kentridge’s animated charcoal drawings
5. Charcoal Animation and Sequential Art
Creating sequential charcoal drawings for animation or narrative purposes.
Process:
- Draw each frame with charcoal
- Make subtle changes between frames
- Photograph or scan each stage
- Compile into a video or flipbook format
- Use erasure and redrawing for transformation effects
Applications:
- Stop-motion animation projects
- Narrative comic work with a charcoal aesthetic
- Time-lapse transformation pieces
- Social media video content
6. Charcoal Powder and Airbrush Techniques
Using charcoal in powder form with various application methods for unique effects.
Methods:
Shaker Application:
- Grind charcoal to a fine powder
- Use a shaker or sifter to distribute the powder
- Blend with various tools
- Creates ultra-smooth gradations
Airbrush Integration:
- Mix charcoal powder with an appropriate medium
- Apply with an airbrush for photorealistic effects
- Perfect for automotive and commercial illustration
- Enables precise gradation control
Stencil Work:
- Create stencils from paper or acetate
- Apply charcoal powder through stencils
- Build complex patterns and imagery
- Combines graphic design with drawing
7. Photorealistic Charcoal Drawing
Achieving photograph-like precision and detail using advanced charcoal techniques.
Requirements:
- High-quality reference photographs
- Extended time commitment (40-100+ hours)
- Complete charcoal pencil range (H through 6B)
- Magnification tools for detailed observation
- Extreme patience and precision
Process:
- Grid method or projection for accurate proportions
- Build values gradually in numerous layers
- Use charcoal pencils almost exclusively
- Blend minutely for seamless transitions
- Preserve sharpest details for final layers
- Work from background to foreground
Popular Subjects:
- Portrait hyperrealism
- Classic car renderings
- Wildlife detail studies
- Celebrity portraits
- Memoriam pieces
8. Experimental Surface Techniques
Drawing with charcoal on non-traditional surfaces for unique effects and contemporary aesthetics.
Alternative Surfaces:
Textured Materials:
- Canvas (primed or raw)
- Wood panels (sealed or textured)
- Corrugated cardboard
- Sandpaper (various grits)
- Fabric (stretched or unstretched)
Prepared Surfaces:
- Gesso-textured paper
- Acrylic-painted grounds
- Collaged paper surfaces
- Metallic prepared boards
Effects:
- Enhanced texture from surface interaction
- Unique mark-making characteristics
- Contemporary aesthetic appeal
- Durability for certain applications
9. Gestural Abstraction and Contemporary Expression
Emphasising expressive, spontaneous mark-making over representational accuracy.
Characteristics:
- Large, confident strokes
- Minimal blending for raw energy
- Focus on emotion over realism
- Incorporate drips, smears, and erasure marks
- Often large-scale for physical engagement
Influences:
- Abstract Expressionism
- Contemporary art movements
- Street art aesthetics
- Performance art documentation
10. Social Media and Time-Lapse Documentation
Creating charcoal work specifically designed for social media consumption and time-lapse documentation.
Considerations:
- Plan composition for vertical (smartphone) format
- Work in camera-friendly lighting
- Stage drawing process for clear documentation
- Create dramatic reveals and transformations
- Consider pacing for viewer engagement
Technical Setup:
- Overhead camera mount
- Consistent lighting throughout the process
- Adequate resolution for detail capture
- Time-lapse software or camera settings
Benefits:
- Builds audience and following
- Documents the artistic process
- Creates engaging content
- Educational value for viewers
- Marketing tool for commissions
Top 5 Charcoal Drawing Tips for Professional Results
1. Master Your Grip and Pressure Control
Overhand Grip for Broad Strokes: Hold charcoal like a brush, with fingers controlling fine adjustments and arm movement, creating broad, confident strokes. This grip prevents cramping during long sessions and produces more natural, flowing lines.
Underhand Grip for Precision: Use a traditional pencil grip only for fine details and precision work. This maintains better control over small areas while preventing hand fatigue.
Pressure Variation Exercise: Practice creating gradual transitions from light to heavy pressure in single strokes. This fundamental skill enables smooth value gradations essential for professional work.
2. Establish Your Darkest Dark Early
Identify and establish your darkest value within the first 20 minutes of drawing. This provides a reference point for all subsequent value decisions, preventing weak, grey drawings.
Implementation:
- Locate the deepest shadow in your subject
- Apply compressed charcoal at full intensity
- Use this as your value “anchor” throughout the process
- Build all other values in relationship to this darkest point
3. Work in Layers, Not Details
Layer Building Strategy:
- First layer: Overall value patterns with vine charcoal
- Second layer: Refined forms with compressed charcoal
- Third layer: Surface textures and details with charcoal pencils
- Final layer: Highlights and final accents
Avoid Common Mistakes: Never start with detailed areas while leaving other sections blank. This approach leads to disjointed, inconsistent drawings lacking overall unity.
4. Use Paper Texture Strategically
Texture Selection:
- Heavy texture: For expressive, gestural work
- Medium texture: For general drawing applications
- Light texture: For detailed, precise work
Texture Enhancement: Work with the paper’s natural texture rather than against it. Let the paper’s surface contribute to your drawing’s character and appeal.
Artists & Illustrators provides excellent guidance on paper selection and texture use.
5. Plan Your Highlights from the Beginning
Preservation Strategy: Identify and highlight areas before beginning and preserve them throughout the drawing process. It’s far more effective to work around lights than to try removing charcoal later.
Highlight Categories:
- Primary highlights: Brightest points showing direct light
- Secondary highlights: Reflected light areas
- Accent highlights: Small bright spots adding sparkle and life
Implementation: Use masking tape or careful charcoal placement to maintain clean highlight shapes throughout your drawing process.
Advanced Charcoal Drawing Methods
1. Subtractive Drawing Approach
This professional technique involves covering the paper with charcoal and “drawing” by removing material to create lights and forms.
Process:
- Cover the entire paper with an even charcoal tone
- Use various erasers to “pull out” light forms
- Add darker accents where needed
- Refine with additional charcoal application
Applications:
- Dramatic portraits with strong lighting
- Atmospheric landscapes
- Abstract compositions
- High-contrast still life

2. Additive vs. Subtractive Combination
In charcoal drawing, artists often combine additive (building up) and subtractive (removing) techniques to create rich tonal range, depth, and dimensionality.
Professional Workflow:
- Establish composition with vine charcoal: Begin by sketching the general outlines and layout using vine charcoal, which is soft, erasable, and perfect for loose initial marks. This helps plan the overall proportions and structure of the drawing.
- Block in major value patterns using the subtractive method: Cover the paper with a mid-tone charcoal layer, then use kneaded or vinyl erasers to “pull out” lighter areas. This subtractive approach allows the artist to quickly carve out light sources, highlights, and volume by revealing the white of the paper.
- Refine forms with additive techniques: Once the lightest values are established, darken areas with compressed charcoal or charcoal pencils to build up shadows, depth, and contours. Layering charcoal gradually gives the forms a more realistic and three-dimensional feel.
- Final details with charcoal pencils: Use harder charcoal pencils for the crispest lines and textures – perfect for refining edges, adding contrast, and placing the darkest darks. This step brings precision and polish to the drawing, completing the tonal hierarchy.
3. Advanced Texture Creation
Fabric Textures:
- Silk: Smooth blending with sharp highlight lines
- Wool: Scumbled application following weave direction
- Denim: Cross-hatching with consistent spacing
Organic Textures:
- Tree bark: Vertical gestural marks with varied pressure
- Water: Horizontal blending with reflected highlights
- Clouds: Soft circular blending motions
Hard Surface Textures:
- Metal: Sharp contrast between highlights and reflections
- Glass: Clean edges with precise highlight placement
- Stone: Irregular stippling and varied tonal application
Composition and Planning in Charcoal Drawing
1. Value-Based Composition
The Four-Value System: Simplify complex subjects into four basic values:
- White/Light Grey: Brightest highlights and light areas
- Medium Grey: General form modelling
- Dark Grey: Form shadows and deeper tones
- Black: Deepest shadows and accents
Value Pattern Planning: Before beginning detailed work, create small thumbnail compositions testing different value arrangements. Strong value patterns are more important than perfect drawing accuracy.
Learn more about composition fundamentals from The Virtual Instructor.

2. Focal Point Development
Contrast Hierarchy: Place your strongest contrasts (darkest darks against lightest lights) at your intended focal point. This naturally draws viewer attention and creates a visual hierarchy.
Edge Variation:
- Sharp edges: At focal points and important transitions
- Soft edges: In background areas and less important elements
- Lost edges: Where forms merge into shadow or background
3. Background Strategy
Atmospheric Perspective: Use charcoal’s natural gradation capabilities to show depth:
- Darker values push elements forward
- Lighter values suggest distance
- Softer edges imply atmospheric haze
- Reduced detail suggests background placement
Common Mistakes in Charcoal Drawing
Understanding and avoiding these common mistakes will significantly improve your charcoal drawing results and accelerate your learning process.
1. Starting with Details Instead of General Forms
The Mistake: Beginning with small details like eyes in a portrait or individual leaves in a tree, before establishing the overall structure and values.
Why It’s a Problem:
- Creates disjointed compositions lacking unity
- Makes proportion corrections difficult
- Leads to unfinished-looking drawings with detailed spots and empty areas
- Causes frustration when the overall proportions are wrong
The Solution:
- Always block in the entire composition first with light marks
- Establish major value patterns across the entire drawing
- Develop all areas simultaneously to maintain relationships
- Add details only in the final stages after forms are solid
2. Using Only Mid-Tone Values
The Mistake: Being timid with charcoal application, resulting in grey, flat drawings without true blacks or clean whites.
Why It’s a Problem:
- Creates weak, lifeless drawings
- Lacks visual impact and drama
- Fails to create a convincing three-dimensional form
- Appears amateur and unfinished
The Solution:
- Establish your darkest dark within the first 20 minutes
- Push shadows to rich, velvety blacks
- Preserve clean highlights throughout the process
- Aim for a full value range from white to black
- Squint at your drawing to check overall value contrast
3. Over-Blending Everything
The Mistake: Blending every area of the drawing to smooth perfection, eliminating all texture and mark variety.
Why It’s a Problem::
- Creates flat, lifeless surfaces lacking character
- Loses the expressive quality that makes charcoal exciting
- Makes the drawing look overworked and photocopy-like
- Eliminates visual interest from varied mark-making
The Solution:
- Blend selectively only where smoothness is essential
- Leave visible marks in less important areas
- Vary your approach: some areas blended, others with visible strokes
- Remember that texture and variety create visual interest
- Ask yourself, “Does this area need blending?” before doing it
4. Neglecting to Preserve Highlights
The Mistake: Applying charcoal everywhere and trying to remove it later for highlights, resulting in dirty, grey “whites.”
Why It’s a Problem:
- Nearly impossible to return to pure white paper
- Creates muddy, contaminated highlight areas
- Damages the paper surface through excessive erasing
- Reduces overall contrast and impact
The Solution:
- Identify all highlighted areas before applying any charcoal
- Work carefully around highlight shapes
- Use masking tape to protect critical white areas
- Apply charcoal gradually so mistakes are correctable
- Accept that preservation is easier than removal
5. Incorrect Proportions and Rushing the Layout
The Mistake: Spending only a few minutes on initial proportions before diving into shading and details.
Why It’s a Problem:
- Creates drawings that “don’t look right” despite good technique
- Proportion errors become obvious once shading reveals them
- Extremely difficult to correct after significant charcoal application
- Wastes hours of work on fundamentally flawed drawings
The Solution:
- Spend 20-30% of total drawing time on accurate layout
- Use measuring techniques (pencil-at-arm’s-length, grid method)
- Check proportions constantly during the initial phase
- Step back frequently to view from a distance
- Don’t proceed to shading until proportions are correct
6. Smudging and Poor Hand Placement
The Mistake: Resting hands directly on the drawing surface, dragging sleeves across finished areas, or failing to protect completed sections.
Why It’s a Problem:
- Smudges and ruins carefully rendered passages
- Contaminates clean highlight areas
- Creates frustration and requires extensive corrections
- Can damage the paper surface permanently
The Solution:
- Place clean paper under your hand while drawing
- Work from top to bottom and left to right (right-handers) or right to left (left-handers)
- Use a bridge (ruler elevated on blocks) to rest your hand above the surface
- Keep a towel nearby for hand cleaning
- Apply workable fixative to protect completed sections
7. Working from Poor Reference Photos
The Mistake: Using low-quality, poorly lit, or out-of-focus photographs as references for realistic drawings.
Why It’s a Problem:
- Missing details force guessing and invention
- Poor lighting eliminates valuable information
- Low resolution makes features unclear
- Results in unconvincing, generic drawings
The Solution:
- Use high-resolution reference photos (minimum 1MB file size)
- Ensure clear, directional lighting in references
- Verify all important details are visible and in focus
- Take your own photos when possible for copyright freedom
- Consider working from life when feasible
8. Using Dirty or Inappropriate Tools
The Mistake: Continuing to use contaminated blending stumps, dirty erasers, or the wrong hardness of charcoal for the task.
Why It’s a Problem:
- Dirty tools spread unwanted charcoal to clean areas
- Wrong tool hardness creates frustrating results
- An inefficient process wastes time and energy
- Compromises the quality of finished work
The Solution:
- Clean blending stumps regularly on scrap paper
- Keep multiple stumps for different value ranges
- Use hard charcoal (H, HB) for light values and details
- Use soft charcoal (4B, 6B) for rich darks
- Knead your kneaded eraser frequently to expose a clean surface
- Have multiple tools available to switch as needed
9. Inconsistent Light Source
The Mistake: Placing shadows randomly without considering a consistent light source direction throughout the drawing.
Why It’s a Problem:
- Creates confusing, unconvincing forms
- Destroys three-dimensional illusion
- Looks amateur and careless
- Makes objects appear to float rather than ground
The Solution:
- Decide on the light source direction before beginning
- Draw an arrow indicating the light direction on your paper edge
- Check every shadow against your light source
- Ensure cast shadows align with the light direction
- Remember that one side will be predominantly light, one predominantly shadowed
10. Giving Up Too Soon
The Mistake: Abandoning drawings when they hit the “ugly stage” (partway through, when everything looks wrong) instead of pushing through to completion.
Why It’s a Problem:
- Never develops skills beyond beginner level
- Misses the learning that happens in later stages
- Creates a habit of leaving work unfinished
- Never experiences the satisfaction of completion
The Solution:
- Understand that almost every drawing looks terrible midway through
- Commit to finishing before starting
- Push past discomfort and keep working
- Trust the process and your developing skills
- Remember that final details transform everything
- Learn that completion brings the most valuable lessons
11. Copying Without Understanding
The Mistake: Mindlessly copying reference photos mark-for-mark without understanding form, anatomy, or lighting principles.
Why It’s a Problem:
- Develops no true drawing skills
- Fails when working without references
- Creates dependence on photos
- Limits creative potential
The Solution:
- Study the structure beneath what you’re drawing
- Understand why shadows fall where they do
- Learn basic anatomy for figure work
- Practice drawing from life, not just photos
- Take time to analyse before and during drawing
12. Ignoring Edges
The Mistake: Making every edge equally sharp throughout the drawing, or conversely, blending every edge to softness.
Why It’s a Problem:
- Creates flat, lifeless drawings
- Fails to guide the viewer’s eye
- Eliminates depth and atmosphere
- Looks rigid and unnatural
The Solution:
- Sharpen edges at focal points
- Soften edges in less important areas
- Lose some edges entirely where forms merge
- Vary edges throughout for visual interest
- Remember: edge quality is as important as value
Troubleshooting Common Issues
1. Overworked, Muddy Drawings
Symptoms:
- Loss of clean whites
- Smeared, dirty appearance
- Lack of value contrast
- Overblended surfaces lacking character
Solutions:
- Start fresh with cleaner materials
- Preserve highlights more carefully
- Limit blending to essential areas only
- Use sharper tools for the final details
2. Weak, Grey Drawings
Symptoms:
- Insufficient contrast range
- Timid mark-making
- Overuse of midtone values
- Lack of bold statements
Solutions:
- Establish the darkest dark immediately
- Push contrast beyond the comfort zone
- Use compressed charcoal more boldly
- Simplify value patterns for a stronger impact
3. Proportional Issues
Symptoms:
- Distorted features or objects
- Incorrect size relationships
- Poor overall composition
Solutions:
- Use construction lines for initial layout
- Measure relationships constantly
- Step back frequently for an overall assessment
- Use plumb lines for vertical alignment
4. Surface Damage from Over-Erasing
Symptoms:
- Roughened paper surface
- Inability to apply clean charcoal
- Shiny, compressed paper areas
Prevention:
- Plan highlights before applying charcoal
- Use gentler erasers (kneaded preferred)
- Apply lighter pressure during corrections
- Accept some marks rather than over-correcting
Advantages of Charcoal Drawing
1. Exceptional Tonal Range
Charcoal offers the widest value spectrum of any drawing medium. From the deepest, velvety blacks to the subtlest light greys, this range enables:
- Dramatic lighting effects that are impossible with other media
- Rich atmospheric depth in landscape work
- Powerful emotional impact through contrast
- Professional-quality results matching fine art standards
2. Versatility Across Subject Matter
- Portrait: Charcoal’s ability to capture skin tones, hair textures, and clothing details makes it the preferred medium for professional portrait artists.
- Landscape: From misty morning scenes to dramatic storm clouds, charcoal excels at capturing nature’s varied moods and atmospheric conditions.
- Still Life: The medium’s textural capabilities bring objects to life, rendering everything from smooth glass to rough fabric with convincing realism.
3. Speed and Efficiency
Quick Coverage: Large areas can be covered rapidly, making charcoal ideal for:
- Gesture drawing sessions
- Plein air landscape work
- Teaching demonstrations
Immediate Results: Unlike wet media requiring drying time, charcoal allows continuous workflow and immediate corrections.
4. Professional Acceptance
- Gallery Recognition: Charcoal drawings are accepted in prestigious exhibitions and collections, offering serious artists a path to professional recognition.
- Commercial Applications: From book illustrations to architectural renderings, charcoal’s professional appearance opens commercial opportunities.
5. Educational Value
Fundamental Skill Development: Working with charcoal develops:
- Value sensitivity for all other media
- Compositional awareness through simplified colour
- Drawing confidence through a forgiving nature
- Professional working methods and discipline
Disadvantages of Charcoal Drawing
1. Physical Challenges
Dust and Mess: Charcoal produces significant dust that can:
- Trigger respiratory issues for sensitive individuals
- Contaminate the workspace, requiring extensive cleanup
- Damage to electronic equipment can occur if not properly contained
- Stain clothing and surfaces permanently
Health Considerations:
- Always work in well-ventilated areas
- Consider wearing dust masks during extended sessions
- Use air purifiers in studio spaces
- Wash your hands thoroughly after each session
2. Preservation Difficulties
Smudging Vulnerability: Unlike ink or graphite, charcoal remains vulnerable to smudging even after completion, requiring:
- Immediate fixative application for protection
- Careful handling and storage procedures
- Professional framing with proper spacing
- Climate-controlled environments for archival preservation
Fixative Limitations:
- Changes the drawing appearance slightly
- Cannot completely prevent all smudging
- Requires proper ventilation during application
- Adds expense and complexity to the process
3. Technical Limitations
Colour Restriction: Working exclusively in grayscale limits:
- Subject matter choices where colour is essential
- Commercial applications requiring full colour
- Certain atmospheric effects are dependent on colour temperature
- Market appeal in colour-preferring audiences
Paper Requirements: Charcoal demands specific paper qualities:
- Textured surfaces are necessary for proper adhesion
- Higher-quality papers increase material costs
- Limited paper colour options compared to other media
- Size restrictions due to paper availability
4. Skill Development Challenges
Steep Learning Curve: Mastering charcoal requires developing:
- Pressure control for varied line weights
- Blending sensitivity to avoid overworking
- Value judgment skills are more critical than in colour media
- Composition planning is due to the difficulty of major changes
Correction Limitations: While charcoal allows corrections, extensive changes can:
- Damage the paper surface through excessive erasing
- Create muddy, overworked appearances
- Lose the freshness and spontaneity that make charcoal appealing
- Require a complete restart in severe cases
Key Takeaways
Mastering charcoal drawing is a rewarding journey that develops fundamental artistic skills applicable to all media. Here are the essential points to remember:
Technical Fundamentals
- Master value control first: A full range from white to rich black is essential for convincing drawings
- Choose appropriate charcoal types: Willow charcoal for sketching, compressed for bold darks, pencils for precision
- Invest in quality tools: Professional charcoal drawing tools, including proper erasers, blending stumps, and archival paper, make a significant difference
- Preserve highlights from the beginning: It’s easier to work around whites than to remove charcoal later
Process and Workflow
- Always work from general to specific: Block in overall composition and values before adding any details
- Establish your darkest dark early: This provides a value anchor for all subsequent decisions
- Layer your approach: Build drawings in stages rather than completing one area at a time
- Step back frequently: Distance reveals issues invisible up close
Common Pitfalls to Avoid
- Don’t over-blend: Selective blending creates more interesting, lively drawings than uniform smoothness
- Avoid mid-tone only drawings: Push contrast boldly for visual impact
- Never rush proportions: Spend adequate time on an accurate layout before shading
- Don’t work from poor references: Quality reference images are crucial for quality results
Subject Selection and Practice
- Start simple: Master basic forms and still life before attempting complex charcoal portrait work
- Practice deliberately: Focus on specific techniques rather than random sketching
- Vary your subjects: Different subjects for charcoal drawing develop different skills – landscapes teach atmosphere, portraits teach form, still life teaches control
Artistic Development
- Study professional work: Analyse how master artists use charcoal drawing techniques to achieve their effects
- Embrace modern approaches: Explore contemporary methods, including digital-hybrid workflows and mixed media
- Develop your artistic voice: Use technical mastery as a foundation for personal expression
- Document your progress: Regular review reveals growth and identifies areas needing focus
Practical Considerations
- Manage the mess: Work in ventilated spaces, protect your environment, and maintain clean tools
- Protect your work: Apply fixative promptly and store with glassine paper in portfolios
- Invest in learning: Quality instruction accelerates progress beyond trial-and-error alone
- Be patient with yourself: Every professional started as a beginner – consistent practice yields results
The 7 Main Drawing Techniques
Remember that mastering hatching, cross-hatching, scumbling, blending, stippling, lifting, and directional stroking provides the technical foundation for any subject or style.
Looking Forward
- Charcoal drawing offers unlimited potential: From traditional realism to contemporary abstraction.
- The medium rewards commitment: Skills compound over time with dedicated practice
- Community accelerates growth: Sharing work and learning from others enhances development.
- Your unique voice matters: Technical skill serves personal expression – let your perspective shine through.
Whether you’re creating your first value scale or developing professional charcoal portraits, remember that every mark you make contributes to your growth as an artist. The journey from beginner to mastery is made of thousands of individual drawings, each one teaching valuable lessons. Embrace the process, learn from mistakes, and celebrate progress along the way.
Learning Resources for Continued Growth
1. Online Learning Platforms
Skill-Specific Tutorials:
- Proko – Portrait drawing fundamentals
- New Masters Academy – Landscape composition techniques
- Watts Atelier – Still life lighting setups
- Drawing Lessons 101 – Figure drawing applications
Professional Development:
2. Building Your Artistic Community
Gallery Opportunities:
Inspiration and Growth:
Conclusion: Your Charcoal Drawing Journey
Mastering charcoal drawing requires patience, practice, and progressive skill development. This comprehensive guide provides the foundation, but your artistic voice will emerge through consistent practice and experimentation.
Remember:
- Master fundamental charcoal drawing techniques before advancing to complex subjects.
- Practice regularly with focused intent rather than random sketching
- Study professional work to understand advanced applications
- Document your progress to track improvement over time
- Experiment boldly while maintaining technical discipline
Your Next Steps
- Gather quality materials based on this guide’s recommendations for charcoal drawing tools.
- Practice basic exercises until they become second nature – especially the 7 main drawing techniques.
- Choose simple subjects for initial projects from the subjects for charcoal drawing section.
- Follow the step-by-step process on how to do charcoal drawing presented in this guide.
- Challenge yourself with charcoal portrait work once fundamentals are solid
- Seek feedback from experienced artists and instructors
- Avoid common mistakes by reviewing the troubleshooting sections regularly
- Explore modern techniques to develop a contemporary approach
- Practice with different charcoal types, including willow charcoal, vine charcoal, and compressed charcoal
- Build a portfolio documenting your progression and best work
Begin your charcoal drawing journey today and build the skills that have helped many artists grow personally and professionally. Whether you’re interested in traditional methods or exploring modern charcoal drawing techniques, this versatile medium offers endless possibilities for creative expression. From your first simple value scale to accomplished charcoal portraits, each drawing brings you closer to artistic mastery.
The path from beginner to professional artist is challenging but deeply rewarding. Embrace charcoal’s expressive potential, learn from every drawing session, and let your unique artistic vision guide your development. With the techniques, tips, and guidance provided in this complete guide, you have everything needed to begin creating compelling charcoal artwork today.
Remember: every master artist began exactly where you are now. Your journey starts with a single mark – make it count.
FAQs
To store charcoal artwork, spray it with a workable fixative to prevent smudging. Place glassine sheets between pieces and keep them flat in a portfolio or archival box. For long-term display, frame it with UV-protective glass and acid-free backing. Store it in a cool, dry place to avoid humidity damage.
Use a workable fixative (e.g., Krylon Workable Fixatif) for charcoal drawings to allow further adjustments. Opt for a final fixative like Lascaux or Grumbacher for a permanent seal. Spray thin, even layers from 12–15 inches away in a well-ventilated area for best results.
Paper texture influences how charcoal adheres:
- Rough/Cold-Press: Best for bold applications and expressive strokes.
- Smooth/Hot-Press: Ideal for fine details and blending.
- Newsprint: Suitable for practice but non-archival. Test small sections before significant projects to ensure the desired effect.
Yes. Charcoal blends well with:
- Graphite: For rich shadows and fine details.
- Ink: Adds striking contrast.
- Pastels: Introduces colour.
- Watercolours/Acrylics: Use charcoal for outlines after the paint dries. Always test combinations on scrap paper for best results.
Effective blending techniques include:
- Blending stumps/tortillons for precision.
- Soft cloth/tissue for smooth gradients.
- Brushes for painterly effects.
- Fingers for organic texture (avoid oils).
- Kneaded erasers to lift highlights. Blend following the form’s direction for realistic depth.
Find expert tutorials and tips for drawing with charcoal at The Art Shop Skipton and Mark Clark Fine Art. These resources provide in-depth guides, techniques, and best practices to enhance your charcoal drawing skills, which are suitable for beginners and advanced artists.