

Whether you are just picking up charcoal for the first time or looking to sharpen your skills with proper charcoal drawing techniques step by step, this guide is for you. It covers everything from choosing your first stick of willow charcoal to rendering full portraits – making it the go-to resource for charcoal drawing for beginners, intermediate artists, and portrait-focused creators alike.
By the end, you will know how to draw with charcoal confidently, which tools to use, how to shade, and how to avoid the mistakes that hold most beginners back.
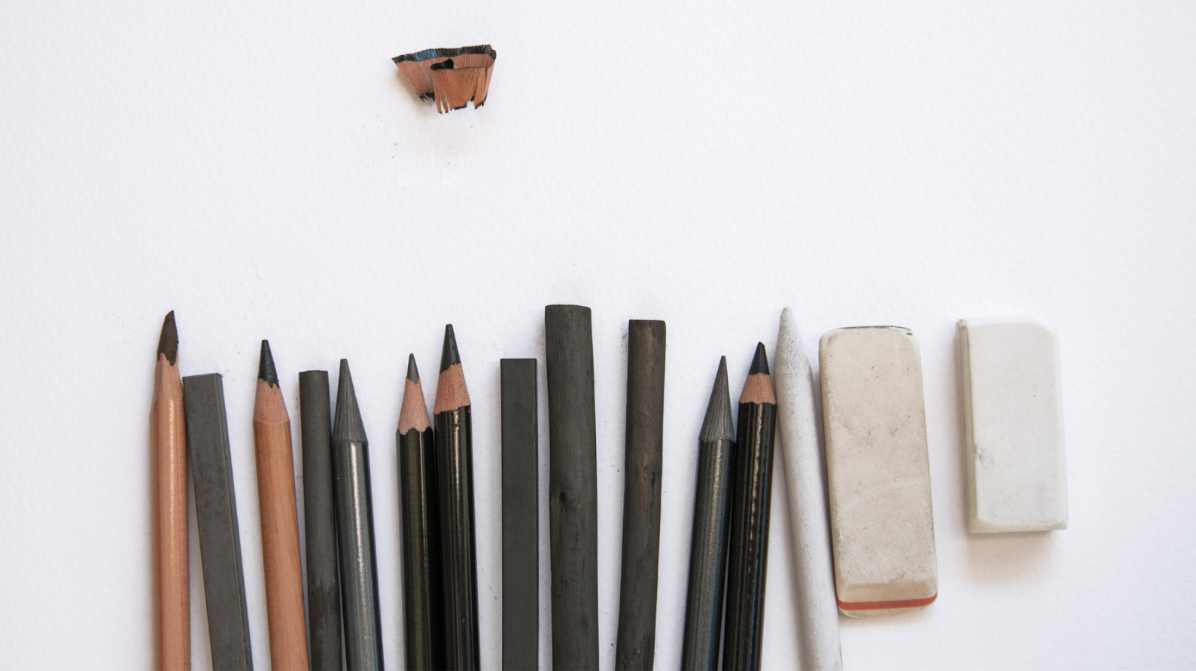
Watch before you begin: For a visual introduction to charcoal shading and mark-making, this step-by-step charcoal drawing demonstration on YouTube is a great companion to the written guide below.
Definition Box: What Is Charcoal Drawing?
Charcoal drawing is a drawing practice that uses carbon-based sticks, pencils, or blocks to create tonal artwork on paper or other surfaces. It is one of the oldest and most expressive drawing media, valued for:
- Its wide tonal range, from pure white to deep black
- The ability to blend, erase, and rework marks easily
- Its suitability for quick gesture sketches and detailed realist work alike
- Being one of the most forgiving media for beginners learning basic charcoal sketching techniques
Charcoal comes in several forms – vine, willow, compressed, and pencil – each suited to different tasks and stages of a drawing.
- Charcoal is one of the best media for beginners because it is erasable, expressive, and builds fundamental drawing skills fast.
- The three main charcoal types are vine/willow (soft, ideal for sketching), compressed (rich blacks, harder to erase), and charcoal pencils (precision and detail)
- The 7 core techniques are hatching, cross-hatching, scumbling, blending, stippling, lifting, and directional stroking.
- Always work from large shapes to small details – never start with detail
- Charcoal drawing for beginners should start with simple objects: spheres, cylinders, and still life
- Preserve your highlights from the start – removing charcoal later always leaves grey marks
- Fix your work immediately after finishing to prevent smudging
- The beginner sphere project in this guide is the best single exercise for learning charcoal shading techniques for beginners
Table of Contents
- Charcoal Types and Characteristics
- Charcoal Drawing Tools and Materials
- Fundamental Charcoal Drawing Techniques
- The 7 Main Drawing Techniques Explained
- Beginner Project: Draw a Charcoal Sphere Step by Step
- How to Create a Charcoal Drawing (Full Process)
- Creating Different Textures in Charcoal
- Subjects for Charcoal Drawing
- Modern Charcoal Drawing Techniques
- Top 5 Charcoal Drawing Tips
- Advanced Charcoal Drawing Methods
- Composition and Planning
- Common Mistakes in Charcoal Drawing
- Troubleshooting Common Issues
- Advantages and Disadvantages of Charcoal Drawing
- Key Takeaways
1. Charcoal Types and Characteristics
Before practising any charcoal drawing step by step, you need to understand your materials. Each type of charcoal behaves differently and suits different stages of work.
Charcoal Types at a Glance
| Charcoal Type | Hardness | Erasability | Best For | Permanence |
| Vine Charcoal | Very Soft | Excellent | Initial sketches, loose studies | Low |
| Willow Charcoal | Soft | Excellent | Large-scale sketches, underpainting | Low |
| Compressed Charcoal | Varies (2H–6B) | Moderate | Rich darks, finished details | High |
| Charcoal Pencils | Varies (H–6B) | Good | Precision and fine detail | High |
| Charcoal Blocks | Soft to medium | Moderate | Covering large areas quickly | Medium |
Vine and Willow Charcoal: The Foundation Media
Both are made from natural wood – grape vine or willow branches. They are the first charcoal most beginners should use.
Key properties:
- Soft, delicate marks that blend easily
- Highly erasable – perfect for correcting charcoal drawing step by step without damaging the paper
- Ideal for gesture drawing, composition planning, and initial layouts
- Creates soft atmospheric effects
Best used for:
- Preliminary sketches before applying compressed charcoal
- Gesture drawing and figure studies
- Teaching yourself basic charcoal sketching techniques
- Pushing through creative blocks during practice sessions
Winsor & Newton vine charcoal is a reliable option for beginners and professionals.
Compressed Charcoal: The Powerhouse
Ground charcoal bound with gum or wax. Far more intense and permanent than vine charcoal.
Key properties:
- Delivers deep, velvety blacks
- Available in hardness grades from 2H to 6B
- Harder to erase – commit your marks
- Excellent for building dramatic contrast and shadows
Best used for:
- Portrait shadows and deep tonal areas
- Still life with strong directional lighting
- Final layers, once your composition is locked in
Charcoal Pencils: Precision Tools
Compressed charcoal encased in wood. The tool of choice for fine detail work.
Key properties:
- Maximum control with minimal mess
- Available in H, HB, 2B, 4B, and 6B grades
- Perfect for rendering eyes, lips, hair strands, and fine texture
- Can be sharpened to a precise point
2. Charcoal Drawing Tools and Materials
Having the right charcoal drawing tools makes a direct difference to your results. Here is what every artist – beginner or experienced – should have to hand.
Primary Charcoal
- Vine or willow charcoal (3 sticks in varied thicknesses)
- Compressed charcoal (range of grades: 2H, HB, 2B, 4B, 6B)
- Charcoal pencils for detail work

Erasers and Correction Tools
- Kneaded eraser – the most important tool after the charcoal itself. Lifts marks gently without damaging paper. Mould it to a point for precision.
- Vinyl or plastic eraser – removes stubborn marks and creates sharp, clean edges.
- Eraser pencil – for fine, detailed corrections
- Electric eraser – for fast, controlled removal over larger areas
Blending Tools
- Blending stumps (tortillons) – rolled paper tools in various sizes for smooth gradations.
- Soft cloth or tissues – for broad atmospheric blending
- Chamois cloth – ideal for very soft transitions
- Cotton swabs – for delicate adjustments in small areas
- Fingers – fast and organic, though use sparingly to avoid transferring oils
Paper
The texture (called “tooth”) of the paper determines how charcoal grips the surface and builds in layers.
| Paper Type | Best For |
| Textured charcoal paper (Strathmore, Canson) | Most charcoal work – strong grip for layering |
| Cold-press watercolour paper | Expressive, bold mark-making |
| Smooth vellum Bristol | Precise, detailed rendering |
| Toned paper (grey, cream) | Portraits and figure work – sets the mid-tone automatically |
Jackson’s Art Supplies has an excellent guide to paper selection worth reading before you buy.
Fixatives
- Workable fixative – protects layers while allowing you to continue working
- Final fixative – seals the completed piece permanently. Always use in a ventilated area.
Starter Kits by Level
Beginner kit: Vine charcoal (3 sticks), 3 charcoal pencils (2B, 4B, 6B), kneaded eraser, 3 blending stumps, charcoal pad, workable fixative
Intermediate kit: Full compressed and pencil range (2H–6B), multiple erasers, varied paper textures, and both fixatives
Professional kit: Premium willow and compressed charcoal, electric eraser, advanced blending tools, archival papers, professional-grade fixatives, flat storage portfolio
3. Fundamental Charcoal Drawing Techniques
These are the foundational charcoal shading techniques for beginners that underpin all other work. Master these before anything else.
Value Control: The Most Important Skill
Value means the lightness or darkness of a tone. Controlling value is how you create the illusion of three dimensions on a flat page.
Beginner drill – the 10-step value scale:
- Draw 10 connected rectangles across your paper
- Leave the first rectangle as bare white paper
- Add a thin layer of charcoal to the second
- Gradually increase the amount of charcoal in each subsequent box
- Make the final box as black as you can get it
- Blend each box smoothly, with no visible lines between steps
- Repeat this exercise until your transitions are even and controlled
This is one of the most valuable beginner charcoal drawing exercises you can practise. Do it before every session when starting.

Mark-Making: Linear and Tonal Approaches
Linear marks:
- Hatching – closely spaced parallel lines in one direction to create tone
- Cross-hatching – two or more layers of hatching at different angles for deeper values
- Contour lines – lines that follow the curves of a form to suggest volume
- Gestural marks – quick, expressive strokes capturing movement or emotion
Tonal marks:
- Side application – using the side of a charcoal stick to cover large areas quickly
- Blending – smoothing charcoal with a stump, cloth, or finger for gradients
- Scumbling – loose, irregular circular marks for rough, broken texture
- Lifting – removing charcoal with an eraser to create highlights and correct areas
Core Shadow vs. Cast Shadow
This distinction is essential for any charcoal drawing step-by-step approach to three-dimensional subjects:
- Core shadow – the darkest area on the object itself, on the side away from the light
- Cast shadow – the shadow the object throws onto the surface beneath or behind it
Keeping these two visually distinct is what makes objects look solid and grounded.
4. The 7 Main Drawing Techniques Explained
These seven techniques form the technical foundation of all charcoal work. Each serves a specific purpose and can be combined for rich, varied results.
Technique 1: Hatching
Creating value through closely spaced parallel lines drawn in one direction.
How to do it:
- Hold the charcoal at a 45-degree angle
- Draw closely spaced parallel lines with consistent spacing
- Vary the spacing to control how light or dark the area reads
Where to use it: Shadow sides of faces, clothing folds, background tones

Technique 2: Cross-Hatching
Layering multiple sets of hatched lines at different angles to build darker values.
How to do it:
- Apply a first layer of hatching in one direction
- Add a second layer at 45–90 degrees over the first layer
- Add more layers for progressively deeper values
Where to use it: Fabric textures in still life, deep shadow areas, hair
Technique 3: Scumbling
Loose, irregular circular or random marks that create an organic, broken texture.
How to do it:
- Use the side of a charcoal stick
- Apply in small, random circular motions with varied pressure
Where to use it: Cloud formations, weathered stone, rough bark, atmospheric backgrounds
Technique 4: Blending / Smoothing
Merging charcoal particles to create gradual, seamless tonal transitions.
How to do it:
- Apply charcoal evenly to the area
- Use a blending stump, tissue, or finger
- Work in circular or directional motions, building gradually
Where to use it: Skin in portrait work, smooth metal or glass surfaces, soft shadow edges
Technique 5: Stippling
Creating value through small dots or marks, with density controlling darkness.
How to do it:
- Hold a charcoal pencil vertically
- Make small, controlled dots
- Place dots closer together for darker areas, further apart for lighter areas
Where to use it: Fine textures, distant foliage, gravel, sandy surfaces
Technique 6: Lifting (Subtractive Technique)
Removing charcoal to create lighter values – drawing with your eraser.
How to do it:
- Cover an area evenly with charcoal first
- Use a kneaded eraser for soft, gentle lifting
- Use a hard eraser or eraser pencil for sharp, bright highlights
Where to use it: Highlights on noses, cheekbones, foreheads – anywhere light hits most directly. This is one of the most powerful charcoal shading techniques for beginners to learn early.
Technique 7: Directional Stroking
Applying charcoal with strokes that follow the contours and form of the subject.
How to do it:
- Observe the direction of your subject’s surface
- Apply strokes that follow the form’s natural curves
- Use longer strokes for smooth surfaces, shorter ones for textured areas
Where to use it: Hair in portraits (each stroke following the growth direction), cylindrical forms like vases or arms
5. Beginner Project: Draw a Charcoal Sphere Step by Step
The sphere is the single best beginner charcoal drawing exercise because it teaches every fundamental skill at once: form, shading, cast shadow, reflected light, and highlight preservation. Complete this project before moving to any other subject.
What you need:
- One stick of vine charcoal
- One piece of compressed charcoal or a 4B charcoal pencil
- A kneaded eraser
- One blending stump
- A sheet of charcoal paper (medium texture)

Step 1: Draw the Circle
Lightly sketch a circle using vine charcoal. Keep the marks very light – this is just a guide, not a finished line. If the circle is not perfect, that is fine. Charcoal is forgiving. Focus on making it roughly round.
Alt text suggestion: Lightly sketched circle outline using vine charcoal on textured paper – basic charcoal sketching techniques for beginners
Step 2: Identify the Light Source
Before applying any tone, decide where your light is coming from. Mark a small arrow outside the circle indicating the direction. Everything that follows depends on this decision.
Assume the light is coming from the upper left for this exercise.
Step 3: Block In the Shadow Zone
Using the side of your vine charcoal stick, lightly apply tone to the lower right portion of the sphere – the side away from your light source. Keep it soft and loose at this stage. Do not press hard. You are building from light to dark, not trying to get the final result yet.
Leave the upper left of the sphere completely untouched – that area will be your highlight.
Alt text suggestion: Blocking in the shadow area of a charcoal sphere – charcoal shading techniques for beginners
Step 4: Blend the First Layer
Using your blending stump, gently blend the charcoal you have applied. Work in a direction that follows the curve of the sphere – circular motions tend to work well here. The goal is a smooth gradient from dark on the shadow side to light on the illuminated side.
Do not blend into the highlight area.
Step 5: Add the Core Shadow and Reflected Light
The core shadow is the darkest band on the sphere – it sits just inside the edge of the shadowed side, not at the very edge. Using your compressed charcoal or 4B pencil, add a slightly darker band here.
Leave a thin strip of slightly lighter tone along the bottom edge of the sphere – this is reflected light bouncing up from the surface below. It is a subtle but important detail that makes the sphere look round rather than flat.
Alt text suggestion: Core shadow and reflected light on charcoal sphere – how to draw with charcoal step by step.
Step 6: Draw the Cast Shadow
The sphere sits on a surface. Where it meets that surface, there is a cast shadow. Draw this with compressed charcoal, making it darkest where it is closest to the sphere and gradually fading as it moves away. The shape should fan out slightly from the base of the sphere.
Step 7: Lift the Highlight and Refine
Using your kneaded eraser, gently dab or pull across the lightest area of the sphere (upper left) to lift the charcoal and reveal clean, bright paper. Use a light touch and work gradually – you want a soft, circular bright spot, not a harsh white patch.
Step back. Look at the sphere. Does it read as a three-dimensional round object? If not, push the darkest areas slightly darker with compressed charcoal and lift the highlight a little more. The contrast between your darkest dark and lightest light is what creates the sense of form.
Alt text suggestion: Completed charcoal sphere with highlight, core shadow, and cast shadow – easy charcoal drawing ideas for beginners, step by step
What you have just practised:
- Basic charcoal sketching techniques (lightly establishing a form)
- Charcoal shading techniques for beginners (gradual tone building)
- The lifting technique (subtractive drawing)
- Core shadow vs. cast shadow
- Reflected light
Repeat this exercise until you can draw a convincing sphere confidently. Then try a cylinder, then a cube. These three forms underpin every subject in this guide.
6. How to Create a Charcoal Drawing: Full Process
Beginner Process (Step by Step)
Step 1: Outline and proportion. Sketch your subject lightly with vine charcoal. Focus on proportions first – not detail. Everything can be corrected at this stage.
Step 2: Identify light and shadow. Mark where your light source is. Identify the main highlight areas and shadow zones before applying any tone.
Step 3: Block in shadows. Using the side of your charcoal stick, loosely fill in the main shadow areas with compressed charcoal. Add mid-tones gradually. Leave highlights untouched.
Step 4: Blend and refine. Blend with a stump or soft cloth. Reinforce contrast where needed. Lift highlights with a kneaded eraser. Add final details with a charcoal pencil.

Practice subjects for beginners:
- Value scales (the most important beginner charcoal drawing exercise)
- Spheres, cubes, cylinders
- Simple still life: fruit, a cup, a single folded cloth
Intermediate Process: Building Realism
- Create thumbnail sketches to plan value and composition before starting
- Build smooth transitions between light and dark using layered application
- Use compressed charcoal for deep shadows, charcoal pencils for precision
- Keep highlights clean throughout – do not let charcoal drift into them
Advanced Process: Charcoal Portrait Drawing
Step 1: Planning Choose a well-lit reference. Sketch proportions and feature placement lightly with vine charcoal.
Step 2: Structure Block in shadows first, then mid-tones. Check symmetry and proportion constantly.
Step 3: Feature detail
- Eyes: Define contrast sharply and add catchlights with an eraser
- Nose: Built form with soft gradations, not outlines
- Lips: Model with tone, not line
- Hair: Treat as a mass first, then refine individual strands with directional strokes
Step 4: Background. Develop a background that enhances the contrast around the face. Use soft, blended edges for realism.
Step 5: Finishing Final highlight lifting, contrast deepening, and edge cleanup. Fix with workable fixative when complete.
7. Creating Different Textures in Charcoal
Skin Textures
Smooth skin (portrait work):
- Apply charcoal smoothly with a blending stump
- Build up in thin layers, very gradually
- Use a kneaded eraser for subtle, soft highlights
- Avoid over-blending – it creates flatness
Aged skin:
- Establish a base tone with smooth blending
- Add wrinkles with a sharp charcoal pencil
- Blend selectively, leaving some lines crisp
- Use directional shading following the natural planes of the face
For deeper portrait techniques, the Portrait Society of America has useful reference material.

Hair
Dark hair:
- Map the overall hair shape and major sections first
- Apply base tone, leaving highlight areas
- Add individual strands following the growth direction with a pencil
- Vary stroke weight and pressure for realism
Light hair:
- Work on toned paper for better value control
- Use predominantly lifting (subtractive) techniques
- Add darker strands selectively to show form
Natural Elements
- Tree foliage – stippling motion for dense leaf clusters, varying pressure for light and shadow
- Water – horizontal blending for calm surfaces, broken reflections for movement
- Rock and stone – directional shading for form, varied pressure for surface texture
Architectural Elements
- Brick – establish wall tone, add brick pattern with an eraser, vary individual brick tones.
- Wood grain – base tone following the wood direction, grain lines added with a pencil
8. Subjects for Charcoal Drawing
Beginner-Friendly Subjects
Simple still life objects:
- Spherical fruit (apples, oranges, pears)
- Cylindrical objects (bottles, cans, cups)
- Cubic forms (boxes, books)
- Single flower in a vase
- Simple folded cloth or drapery
These teach value, shading, and form with forgiving, stationary subjects. They are among the best easy charcoal drawing ideas for anyone starting out.

Natural objects:
- Individual leaves, seashells, pebbles, feathers, pinecones
Intermediate Subjects
- Landscape elements – trees, rocky formations, cloud studies, water reflections
- Animal studies – pets, birds, horses (fur and feather texture suit charcoal perfectly)
- Architectural subjects – historic buildings, doorways, bridges, interior spaces
Advanced Subjects
Charcoal portrait work: Self-portraits, character studies of elderly faces, child portraits, and multi-figure compositions are the ultimate test of observation and technique. Charcoal is the medium of choice for portrait drawing precisely because of how well it renders skin tones and subtle tonal transitions.
Figure drawing: Gesture drawings, full-figure studies, and partial figure studies (hands, feet, torso) all develop a foundational understanding of human anatomy. Charcoal’s coverage speed makes it ideal for timed gesture sessions.
Complex still life: Multiple objects with varied textures – reflective glass, transparent bottles, fabric with complex folds – test every technique simultaneously.
Subject Selection Tips
When choosing what to draw, consider:
- Your current skill level – start simple and progress incrementally
- Available time – simple objects for short sessions, portraits and landscapes for extended work
- Lighting control – indoor subjects let you control the light completely
- Personal interest – you will always produce better work on subjects that genuinely interest you
9. Modern Charcoal Drawing Techniques
Contemporary artists continue to push what charcoal can do. These approaches extend traditional methods into new territory.
Digital-Hybrid Workflow
Combining traditional charcoal with digital tools for planning, editing, and distribution:
- Use Procreate or Photoshop to plan compositions and value patterns before touching paper
- Print reference images with adjusted values for better translation to charcoal
- Scan completed drawings for digital enhancement or portfolio use
Wet Charcoal Techniques
Applying water to charcoal creates paint-like, ink-wash effects:
- Water wash – apply charcoal powder, then spread with a wet brush for atmospheric washes
- Spray bottle method – mist dry charcoal lightly for organic, unpredictable textures
- Direct wet application – dip willow charcoal in water for intense, permanent marks
Always use archival paper designed to handle moisture.
Mixed Media
- Charcoal + white chalk on toned paper – expands the value range dramatically for portraits and figure studies.
- Charcoal + graphite – charcoal for broad tones, graphite for precise detail and clean lines
- Charcoal + ink – charcoal for value, ink for sharp accents and definition
- Charcoal + acrylic gesso – textured surfaces and corrections not possible on bare paper
Photorealistic Charcoal Drawing
Achieving photograph-like precision requires:
- A full charcoal pencil range (H through 6B)
- Extremely gradual, layered value building
- 40–100+ hours of work for complex subjects
- A methodical approach, working from background to foreground
10. Top 5 Charcoal Drawing Tips
Tip 1: Master Your Grip and Pressure
Overhand grip – hold charcoal like a brush for broad, confident marks. Uses the arm rather than the wrist. Reduces cramping during long sessions.
Underhand grip – traditional pencil grip only for fine detail. Saves this position for charcoal pencil work.
Practice drill: Draw a single stroke that transitions from light to heavy pressure smoothly. Repeat until the transition is seamless. This is one of the most valuable charcoal drawing tips for beginners.
Tip 2: Establish Your Darkest Dark Within the First 20 Minutes
Find the deepest shadow in your subject. Apply compressed charcoal there at full intensity. Use this as your value anchor – every other tone in the drawing is judged against it. This single habit prevents weak, grey drawings more than any other technique.
Tip 3: Work in Layers, Not Details
- Layer 1 – overall value patterns with vine charcoal
- Layer 2 – refined forms with compressed charcoal
- Layer 3 – surface textures with charcoal pencils
- Final layer – highlights and final accents
Never complete one area before the rest of the drawing exists. Build everything together.
Tip 4: Use Paper Texture Strategically
- Heavy texture – expressive, gestural work
- Medium texture – most general charcoal drawing applications
- Light texture – detailed, precise rendering
Work with the paper’s surface rather than against it. Artists & Illustrators has guidance on paper selection and texture worth reading.
Tip 5: Plan Your Highlights Before You Begin
Identify and highlight areas before applying any charcoal. Work carefully around them. It is far easier to preserve white paper than to recover it later.
Highlight categories to track:
- Primary highlights – the brightest spots showing direct light
- Secondary highlights – reflected light areas
- Accent highlights – small bright spots that add life and sparkle
11. Advanced Charcoal Drawing Methods
Subtractive Drawing: Drawing with Your Eraser
This technique involves covering the page first, then carving out the image by removing charcoal.
Process:
- Cover the entire paper with an even mid-tone layer of charcoal
- Use erasers to pull out lighter areas – forms emerge from the darkness
- Add darker accents where needed with compressed charcoal
- Refine by adding and removing until complete
This approach is excellent for dramatic portraits with strong lighting, atmospheric landscapes, and high-contrast still life.

Additive and Subtractive Combined: The Professional Workflow
Most experienced artists use both approaches together:
- Sketch the composition with vine charcoal
- Cover the drawing with a mid-tone layer
- Use erasers to pull out lights (subtractive)
- Refine shadows and mid-tones with compressed charcoal (additive)
- Finish details with charcoal pencils
This combination gives the widest control over the full value range.
Advanced Texture Creation
Fabric textures:
- Silk – smooth blending with sharp highlight lines
- Wool – scumbled application following weave direction
- Denim – cross-hatching with consistent spacing
Hard surface textures:
- Metal – sharp contrast between highlights and reflections
- Glass – clean edges with precise highlight placement
- Stone – irregular stippling with varied tonal application
12. Composition and Planning
The Four-Value System
Simplify complex subjects into four values before starting:
- White/light grey – highlights and direct light
- Medium grey – general form modelling
- Dark grey – form shadows and deeper tones
- Black – deepest accents and cast shadows
Strong value patterns are more important than drawing accuracy. Plan yours in small thumbnail sketches before committing to the full page.

Focal Point and Edge Variety
- Sharp edges at your focal point – they draw the eye
- Soft edges in background areas and less important elements
- Lost edges where forms merge into shadow
Atmospheric Perspective
Use charcoal’s natural gradation to create depth:
- Darker values push objects forward
- Lighter values suggest distance
- Softer edges imply atmospheric haze
- Reduced detail signals background placement
13. Common Mistakes in Charcoal Drawing
Starting with Detail Before Form
The mistake: Beginning with individual features (an eye, a leaf) before establishing the whole composition.
The fix: Block in the entire drawing first with very light marks. Develop all areas at the same rate. Add detail only in the final stages.
Using Only Mid-Tones
The mistake: Being cautious with charcoal application, producing grey, flat drawings without true blacks or clean whites.
The fix: Establish your darkest dark within the first 20 minutes. Push shadows to velvety black. Preserve clean highlights. Squint at your drawing to check contrast.
Over-Blending Everything
The mistake: Blending every mark until the drawing looks overworked and characterless.
The fix: Blend only where smoothness is genuinely required. Leave visible strokes in less critical areas. Texture and mark variety are what make charcoal drawings interesting.
Neglecting to Preserve Highlights
The mistake: Applying charcoal everywhere and trying to erase highlights back later.
The fix: Identify all highlighted areas before you start. Work around them carefully. Erasing back to true white is rarely fully successful.
Rushing the Initial Layout
The mistake: Spending only a few minutes on proportions before diving into shading.
The fix: Spend 20–30% of total drawing time on accurate layout. Check proportions constantly. Do not begin shading until the structure is solid.
Inconsistent Light Source
The mistake: Placing shadows without reference to a consistent light direction.
The fix: Decide on your light source before you begin. Mark it with a small arrow on the edge of your paper. Check every shadow against it throughout the drawing.
14. Troubleshooting Common Issues
Overworked, Muddy Drawings
Symptoms: Loss of clean whites, smeared appearance, lack of contrast.
Solutions:
- Start fresh with clean materials
- Protect highlights more carefully from the start
- Limit blending to essential areas only
- Use sharper tools for final details
Weak, Grey Drawings
Symptoms: Insufficient contrast, timid marks, no bold darks.
Solutions:
- Establish the darkest dark immediately
- Use compressed charcoal more boldly
- Simplify the value structure – fewer mid-tones, clearer contrast
Surface Damage from Over-Erasing
Symptoms: Roughened paper, inability to apply clean charcoal over damaged areas.
Prevention:
- Plan highlights before applying any charcoal
- Use a kneaded eraser with gentle pressure
- Accept some marks rather than over-correcting
15. Advantages and Disadvantages of Charcoal Drawing
Advantages
Exceptional tonal range: Charcoal offers the widest value range of any drawing medium – from the deepest black to the subtlest light grey. This makes it ideal for dramatic lighting effects and emotionally powerful portrait work.
Forgiving and correctable Vine and willow charcoal can be erased, blended, and reworked almost indefinitely. This makes it the ideal medium for charcoal drawing for beginners to learn the fundamentals without anxiety.
Speed: Large areas can be covered quickly. Charcoal is the first choice for gesture drawing sessions and timed studies.
Versatility works equally well for portrait, landscape, still life, figure drawing, and abstract work. Few media match this range.
Educational value: Working in charcoal develops value sensitivity, compositional awareness, and observational skills that transfer directly to oil painting, graphite, and other media.
Disadvantages
Dust and mess: Charcoal produces significant dust. Work in well-ventilated spaces. Wear a dust mask during extended sessions. Keep electronics away from your drawing area.
Smudging vulnerability: Charcoal remains vulnerable to smudging until fixed. Apply workable fixative to completed sections as you work, and use a final fixative when finished.
Colour limitation: Charcoal works only in greyscale. This limits certain subject matter and commercial applications.
Paper requirements: Textured, higher-quality paper is necessary for charcoal to adhere properly. This adds to material costs compared to some other drawing media.
16. Key Takeaways
- Start every session with a 10-step value scale – it is the single best practice drill for charcoal at any level.
- Master the 7 techniques: hatching, cross-hatching, scumbling, blending, stippling, lifting, and directional stroking.
- The sphere project is the most valuable beginner charcoal drawing exercise – return to it regularly.
- Always work from large shapes to small details
- Establish your darkest dark within the first 20 minutes of every drawing
- Preserve highlights from the start – recovering them later is always imperfect
- Choose vine or willow charcoal for sketching and corrections; compressed charcoal for rich, permanent darks
- Develop your skills with simple objects before moving to portrait or figure work
- Fix your work promptly after each session to prevent smudging
- For easy charcoal drawing ideas, start with fruit, bottles, and simple drapery – then progress to faces and full figures
17. Learning Resources for Continued Growth
Online Drawing Platforms
- Proko – portrait drawing fundamentals and figure work
- New Masters Academy – shadow fundamentals and landscape composition
- Watts Atelier – still life lighting and classical technique
- YouTube: Step-by-step charcoal drawing demonstration – a visual walkthrough of charcoal shading techniques for beginners
On Cosimo
- Cosimo Academy – structured resources for artists building their creative practice and skills
- Overcoming Creative Blocks: Techniques for Artists – practical guidance for when practice feels stuck
- How to Develop a Unique Artistic Style – using technical mastery as a foundation for personal voice
- How to Price Your Art – once your charcoal work is ready to sell
- Sell Your Art Online for Free – building a portfolio and reaching collectors
About the Author
John Sewell
John Sewell is the founder of Cosimo and holds a Master’s Degree in History of Art from the University of Birmingham. He built Cosimo to give emerging artists fair, transparent ways to reach collectors directly. He was also shortlisted for the Great British Entrepreneur Awards. His background in art, creative entrepreneurship and digital marketplaces informs his writing on artist development, accessible art, and the future of online art sales.
FAQs
Spray your completed drawing with a workable fixative first. Place glassine sheets between works when storing them. Keep drawings flat in a portfolio or archival box. For long-term display, frame with UV-protective glass and acid-free backing. Store in a cool, dry environment.
Use a workable fixative (such as Krylon Workable Fixatif) while you are still working, as it lets you continue drawing over fixed layers. Use a final fixative (such as Lascaux or Grumbacher) to seal the finished piece. Spray in thin, even layers from 30–35 cm (12–15 inches) away, always in a well-ventilated space.
- Rough / cold-press paper – best for bold, expressive charcoal shading techniques and gestural work
- Smooth / hot-press paper – ideal for fine detail and precise blending
- Toned paper – provides a built-in mid-tone, useful for portraits and figure work
- Newsprint – fine for beginner charcoal drawing exercises and practice, but not archival
Yes. Charcoal combines well with:
- Graphite – charcoal for broad tones, graphite for fine line and precise detail
- Ink – adds bold contrast and definition to charcoal underlayers
- White chalk or pastel – extends the tonal range on toned paper
- Watercolour or acrylic – use charcoal for underdrawing or final detail over dry paint
Always test combinations on scrap paper first.
- Blending stumps/tortillons – precise control for gradients and smooth transitions
- Soft cloth or tissue – broad atmospheric blending over large areas
- Fingers – organic texture, but use sparingly to avoid transferring skin oils
- Kneaded eraser – lifts charcoal to create or refine highlights
- Brushes – soft, painterly blending effects
Always blend in the direction of your subject’s form for the most convincing results.
- Proko’s portrait fundamentals for figure and face-focused charcoal work
- New Masters Academy for shadow theory and classical technique
- Jackson’s Art Supplies paper guide for materials
- Step-by-step charcoal drawing demonstration on YouTube for a visual companion to this guide
- Cosimo Academy for structured artist development resources